Programming basics objects the Smart Home in MajorDoMo

MajorDoMo combines a variety of components, many of which involve reading or changing data. To organize efficient data exchange between parts of the system were established object model. This model is largely consistent with the paradigm of Object Oriented Programming (OOP) people are familiar with this paradigm is not difficult to understand existing models. However, knowledge of the OOP principles is not necessary, because the built-in system, the model is quite simplified and can be applied without deep knowledge of a programming language or as the first step of learning this concept. The article describes the main components of this model.
Part 1. Theory.
Classes
A class is a description of the main properties that should be possessed by all objects belonging to this class. The class is not an object and cannot itself contain the values of these properties, it merely describes the characteristics and behaviors of objects. A physical analogy, think of the example of a simple classification — for example, the class "Door" can belong to the object "the Door to the bathroom", while "Door" can have a description of the property "Status" (open or closed), but the immediate value can only be set for a specific object, but not for the class.
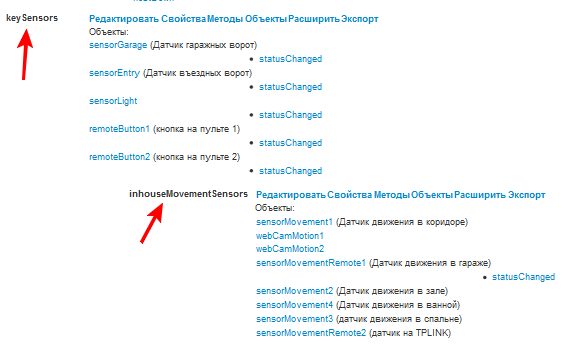
An important feature of classes is the ability to create subclasses that inherit all properties and methods of the parent class, but it can have its own properties and methods. Or having their own special implementation of "parent" methods.
Example:
Objects
The facility is a state of real (or virtual) object. Object properties can have specific values (e.g. "status" ,"temperature", etc.). In addition, the object can be given properties that complement the set of properties of the class to which the object belongs. The same object can be defined its own implementation of the methods described in class.
Example:

The object belonging to the class which, in turn, is a subclass inherits the properties and methods of all parent classes.
Properties
The property is a concrete parameter that describes the state of the object. As has been described above, classes can describe the properties (name, description, etc.), but the property value can be set only for a specific object.
Example (description of class properties):
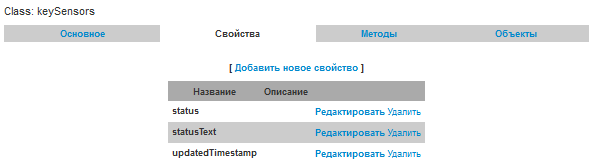
Example (setting/reading properties of the object):
the
setGlobal('myObject.myProperty',12345);
$value=getGlobal('myObject.myProperty');
Methods
The methods are a description of the possible actions of the object (or actions on the object). Returning to the physical analogy, you can specify that the class "Door" can have methods "Open" and "Close", i.e. all objects of the same class will have this method and we can open the door calling "the Door to the bathroom.Open". The implementation of the method is a script in the programming language PHP. In this case, the part of the script may be setting the property "Status" to "Open".
Example (object method)
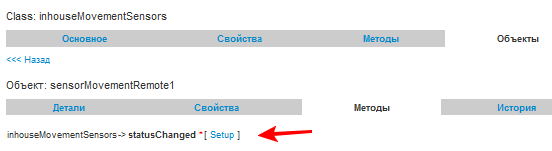
Example (code of a method):
the
if ($this->getProperty('status')) {
say("Motion in garage");
}
Example (method call):
the
callMethod('myObject.myMethod',$params); // $params is not a mandatory parameter arrayPart 2. Practice.
In the second part of the article I will give an example of "embedding" of the real equipment in the object system of MajorDoMo. As an example of the equipment I will use system components nooLite, which Prov was presented at Habra, so in General about the capabilities of these components many of you know. All steps are performed in control panel MajorDoMo under Objects without modifying the original source code or system configuration files.
So, for examples we will use:
the
- USB transmitter to send signal
Some of the Executive power modules (conventional + adjustable/dimmable) the
Plan the points:
-
the
- Create abstract classes for our purposes the
- Create more specific classes for supported hardware the
- Adding objects the
- Control!
Item 1
We start from the fact that in our Smart Home will often be the problem on/off any equipment, so get on the top level of the class Relays (Relay) with the property status (1/0 — on/off), as well as with the methods turnOff, turnOn, switch and refresh.
Code method turnOff (shutdown the device):
the
$this->setProperty("status",0);Code method turnOn (enable the device):
the
$this->setProperty("status",1);Method code switch (switching device):
the
$status=$this->getProperty("status");
if ($status) {
$this->callMethod('turnOff');
} else {
$this->callMethod('turnOn');
}
Method code refresh (update device status):
the
$status=$this->getProperty("status");
if ($status) {
$this->callMethod('turnOn');
} else {
$this->callMethod('turnOff');
}
We assume that this necessary minimum, which is inherent in all managed objects.
Item 2
Next, we will add support for the needed equipment nooLite through the creation of a child class nooLite. To differ from the parent it will be a specific property of the channel (channel actuator control module). In addition, you will add a new method of sendCommand (sending commands) code and overridden methods turnOff and turnOn.
Code a new method of sendCommand (sending commands to the device Noolite):
the
$cmdline='"c:\Program Files\nooLite\nooLiteCMD.exe" -api '.$params['command'];
safe_exec($cmdline);
The code for the overridden method changed:
the
$this->setProperty("status",0);
$this->callMethod("sendCommand",array('command'=>'-off_ch'.$this->getProperty("channel")));
The code for the overridden method turnOn:
the
$this->setProperty("status",1);
$this->callMethod("sendCommand",array('command'=>'-on_ch'.$this->getProperty("channel")));
Other methods we do not touch — they are unaffected and work as expected with a new class (thanks to the PLO!).
Actually, now we can add arbitrarily many objects of a given class at no additional cost for programming the behavior of each of them.
Item 3
Add object noo1, putting in the description that this "ceiling lights in the living room", proceed to configure its properties and set the property value noo1.channel = 1, i.e. this power module is located on the first control channel.
Item 4
Now we can enable/disable this module from any script with the following code:
the
callMethod('noo1.turnOn'); // include
callMethod('noo1.turnOff'); // turn off
Or register to manage this module from the menu like this:
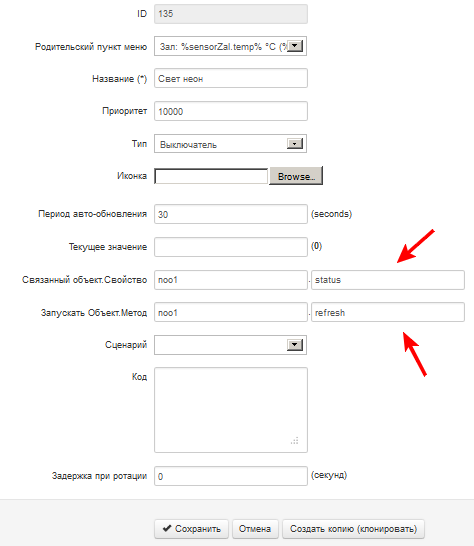
Then here's the control:

Secure the acquired passing points 2-4 to add one more device — power unit nooLite with the support of dimming.
Item 2.
Created from the above class nooLite create a child class nooLiteDimmer by adding an additional property brightness. Will also add a new method to optimize and rewrite code refresh methods, turnOn, turnOff
Code of the new method dim:
the
if ($params['value']) {
$this->setProperty("brightness",$params['value']);
$this->callMethod("refresh");
}
Code overriding the refresh method:
the
$value=$this->getProperty("brightness");
$this->callMethod("sendCommand",array('command'=>'-set_ch'.$this->getProperty("channel").' -'.$value));
if ($value>0) {
$this->setProperty('status',1);
} else {
$this->setProperty('status',0);
}
The code for the overridden method changed:
the
$this->setProperty("status",0);
$this->setProperty("brightness",0);
$this->callMethod("refresh");
The code for the overridden method turnOn:
the
$this->setProperty("status",1);
$this->setProperty("brightness",100);


Item 3.


Almost similar to the previous version — added object noo2 prescribed properties for a control channel (2). The object is ready.


Item 4.


The object of noo2 can be managed in the same way as noo1, but we also can use the method to dim the brightness setting:

the callMethod('noo2.dim',array('value'=>50)); // set brightness to 50%


To control the lamp in the menu will create the following element:


The appearance of the control for the user has been given above in the example of conventional power control unit.


In Nootekhnika here's a three-channel dimmer control for RGB led:


Integration I'll leave behind the scenes (or as "homework", if you will), but as a result of simple manipulations such as those described above, it is possible to receive here such interface:


Instead of an epilogue

The object system is especially useful in the case where we have a number of similar objects (e.g., sensors or actuators) with the same properties and behaviors. In this case, we can define one class and add only the objects with different names, or some individual features, but to have only one scenario of the behavior described in the method class.


In addition, all the available modules, and providing communication of the system with specific "iron" (and not) protocols allow you to specify the "anchor" of the settings for supported hardware to properties or methods of certain objects, allowing object-level to have the current state of all connected systems (SNMP, ZWave, 1-wire, etc.).


Well, in the end, I would like to say that to learn many things the easiest way on the examples of specific implementations, which is a special project CONNECT, which you can use to share the finished configuration of your Smart Home. For example, your profile I show the components used, configuration, management menu, created scripts, classes and objects MajorDoMo. The profile provides information about properties values and, of course, there is no ability to operate equipment — all information is provided for informational purposes only.


A good automation!


Комментарии
Отправить комментарий