The animation in MooTools. The basics and beyond.
Animation MooTools.
Basic principles. Class Fx.
so, today we'll do the animation. First we need to understand how to implement the principles of animation in MooTools. The animation in MooTools is the change of any property of any element in time (transition), for example, change CSS left property, is the movement horizontal, and background-color — smooth change the fill color.To create animated effects in MooTools Fx class is used. All classes that implement some animations are inherited from the Fx. The class defines helper methods for the animation:
the
start — this method starts the transition.
set — changes the value of the animated parameter. Called on each step of the transition. The meaning of this abstract method if it can be called, i.e. every implementation of the animation plugin needs to override the set on his own.
cancel — cancels the current animation.
pause — stops the current animation.
resume — resumes a paused animation.
the
fps — number of frames per second for animation. Characteristic, if I may say so, the "smoothness" of the animation — what it is, the "smoother."
unit is a unit of measurement, for example "em", "px", "%". Used for conversions of CSS properties.
link is the option characterizing the behavior of the animation when the transition time was caused by start. Can take the following values (example with different values link):
'ignore' — all calls start during the animation are ignored. Is used by default.
'cancel', the current animation will be stopped and started new with the options that came to start.
'chain' — all calls start during the animation will be added to the circuit and the animation starts immediately after the end of the current.
duration — the duration of the animation.
transition is the equation of the transition. Read more equations of the transitions are discussed below.
-
the
- the Time elapsed from the start of the transition to the current time divided by the duration, so the result is a number between 0 and 1 describing the progress of the animation. Let's call it progress.
- the Value of the animated parameter is calculated like so: param = (to − from) × delta + from, where from is the initial parameter value, to — ending value of the parameter. Obviously, when delta equal to 0 we get the initial value of the parameter, and at 1 — end.
This number is passed to the function transition (discussed below). The result of the computation of the transition function of call delta. the
It is worth emphasizing that by itself, the Fx class is abstract, then there is nothing he is not animating, he's operating data for the implementation of the principles of animation. Direct animation do the heirs of the Fx. Mainly to animate elements in HTML pages are used by classes that animesouth various CSS properties of elements. On these classes we will discuss and consider creating your own class that implements the animation of non-CSS properties.
Equations transitions. Writing your own equations.
Agree, not very nice looking animation of moving the element on the page if he started sharply and as abruptly stopped at the end of the road. This happens when the increment delta (mentioned above) at all times remains constant. It's called linear transition, its equation delta = progress. If you take several successive values progress from 0 to 1 and substitute into the equation, we get the usual line, which sharply starts at 0 and ends sharply at 1.I hope the previous paragraph was clear about what the transition equation is the law by which you want to compute the increment delta. Fortunately, MooTools has a set of laws that will make your animation smooth, sharp, decaying, jumping, etc., but to us it will be enough — we would write their own equation. But more on that later. Now let's see what are the standard equations:
the
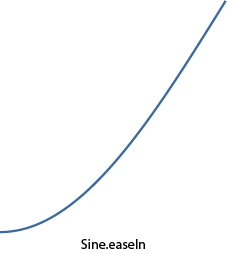
- theSine — a piece of sine wave (delta = 1 − sin((1 − progress) × π / 2)).
Linear — video (delta = progress).
Quad is a quadratic function (delta = progress2).
Cubic, a cubic function (delta = progress3).
Quart — delta = progress4.
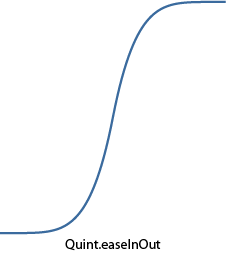
Quint — delta = progress5.
Pow — the General power function delta = progressx (default value is equal to 6).
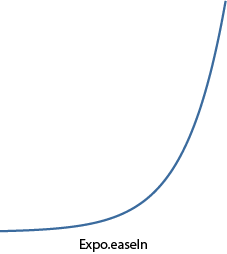
Expo — the exponential function (delta = 2(progress − 1) × 8).
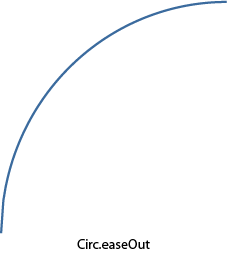
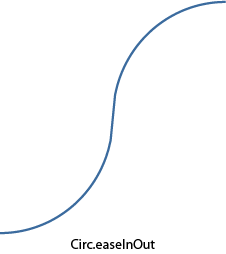
Circ — a quarter of the circumference (delta = 1 − sin(acos(progress))). the
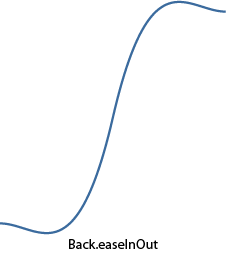
Back — it pulls delta in the negative, and then gradually brings to 1.
Bounce — Bouncing transition.
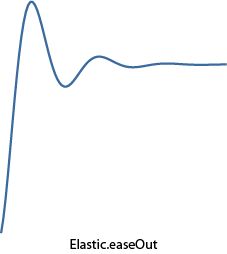
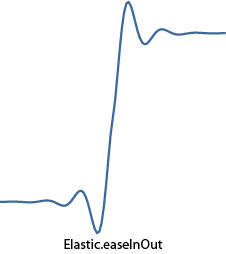
Elastic — elastic transition (the only Association is the gum :).
the
easeIn — this is the default and does not change anything.
easeOut — calculates a delta value according to the formula 1 − transition(1 − progress), thus expanding a curve of the transition.
easeInOut — to mid-transition computes delta formula transtition(2 × progress), and after — (2 − transition(2 × progress)) / 2, a transition of two curves: a direct and detailed.
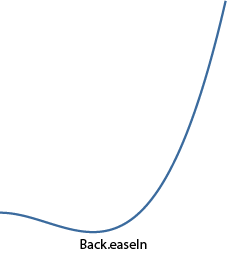

And here is the jumping animation.


A quarter of a circle.

Gum.

The exponential function.


Of the fifth degree.


A piece of a sine wave.


Example showing the use of different equations of the transitions in animation to watch here.
And suddenly among the variety of built-in equations will be needed? No problem, you can always write your what we now turn. Ideally, the equation should be such that when the argument is zero return 0, and when the unit — 1. In this case, at the beginning and end of the animation will not animate jumps of the parameter.
As an example, I wanted to write the equation that simulates fluctuations in the electrocardiogram. Of course it would be possible to remove someone's ECG points and interpolate them into the polynomial, for example (even for such a program in the third year wrote :), but it would not be so precise and resource intensive (on large orders) at the end use. Therefore, the function was difficult. All conditional scope (0 to 1) divided into intervals, each of which has its own little feature. The result was the following:

As can be seen, the first period is defined by the "Quad" feature for a smooth rise from zero, then the set of straight lines with different inclinations and lengths, and at the end of a quarter of a circle for a smooth recovery in the unit. Here's how it looks in the curves:


Add this function to the Fx object.Transitions as follows:
 Fx.Transitions.extend({

Heartbeat: function(x){

if (x < 0.3)

return Math.pow(x, 4) * 49.4;


if (x < 0.4)

return 9 * x - 2.3;


if (x < 0.5)

return -13 * x + 6.5;


if (x < 0.6)

return 4 * x - 2;


if (x < 0.7)

return 0.4;


if (x < 0.75)

return 4 * x - 2.4;


if (x < 0.8)

return -4 * x + 3.6;


if (x >= 0.8)

return 1 - Math.sin(Math.acos(x));

}

});
Now you can use it by passing in an option to transition (note: the example uses the plugin Fx.Morph, which will be discussed below, but for now it can only be considered a heir to Fx, understand the designer all the extras that understand Fx):
 var fx = new Fx.Morph($('Heart'), { transition: Fx.Transitions.Heartbeat, duration: 900, link: 'chain' });


// Produce the animation 10 times.

for (var i = 0; i < 10; i++){

// Increase the heart.

fx.start({

'width': 265

'height': 238

'margin-left': -20

'margin-top': -20

});


// Decrease the heart.

fx.start({

'width': 225

'height': 198

'margin-left': 0

'margin-top': 0

});

}
In the HTML code there is only one item:
<img id="Heart" src="./images/heart.png" />
A living example of lies here. Interesting effect: while testing the script I was listening to Drum'n'bass and it seemed that the beating of this heart is very in tune to the music (try it yourself).
Ok, we may not have achieved the perfect human ECG, but its function is still written. As it turned out, it's not that hard :).
Chain. Grip animation changes.
Very often need to ask multiple, consecutive transformations so that each of the following was carried out after the previous. If you simply call them sequentially, by default every following call will be ignored (see the option link of Fx class). If you specify a link to 'chain', then all subsequent calls will be added to the chain and will be executed sequentially.However, there is a special syntax for creating chains. They are implemented in the class Chain. It contains three methods:
the
chain — appends the function to the end of the chain.
callChain — causes the next in the chain function, and removes it from the chain.
clearChain — clears the chain.
The caterpillar itself is a normal div, which change CSS properties left, top, width and height creating the effect of movement (Oh Yes, even changes its color for realism). Step caterpillars will consist of two parts: the first movement of her head in the right place, and the second is pulling the tail to the head. In the example used Fx.Morph that allows you to animate multiple CSS properties which will be discussed in detail below.
 var CaterpillarController = new Class({

// Implement methods in the class Chain.

Implements: Chain,


// Maximum and minimum size of caterpillar.

largeSize: 200,

smallSize: 10,


// Constructor.

initialize: function(caterpillar){

this.caterpillar = $(caterpillar);


// Create element for caterpillar instance of the Fx.Morph with the clutch subsequent calls to start.

this.fx = new Fx.Morph(this.caterpillar, { duration: 900, transition: Fx.Transitions.Expo.easeOut, link: 'chain' });


// once the animation completes the second stage of a caterpillar called the next function in our chain.

this.fx.addEvent('chainComplete' this.callChain.bind(this));


return this;

},


// This method is responsible for one step of a caterpillar.

// the input is passed dimension (dimension: horizontal: true, vertical: false)

// and direction (positive — true, negative — false).

move: function(dimension, direction){

var, dimensions = this.caterpillar.getCoordinates();

var options1, options2;


// Generated objects with options for two phases of a step of caterpillar.

if (dimension){

// Move horizontally.

if (direction){

options1 = { 'width': dimensions.width + this.largeSize };

options2 = { 'left': dimensions.left + this.largeSize 'width': this.smallSize };

} else {

options1 = { 'left': dimensions.left - this.largeSize 'width': this.largeSize + this.smallSize };

options2 = { 'width': this.smallSize };

}

} else {

// Move vertically.

if (direction){

options1 = { 'height': dimensions.height + this.largeSize };

options2 = { 'top': dimensions.top + this.largeSize 'height': this.smallSize };


options1 = { 'top': dimensions.top - this.largeSize 'height': this.largeSize + this.smallSize };

options2 = { 'height': this.smallSize };

}

}


// Extend objects adding a property to change the color (to make it more realistic).

$extend(options1, { 'background-color': '#7CCB26' });

$extend(options2, { 'background-color': '#4C9004' });


// Start two stage

// (the second phase will begin after the first, remember the link is 'chain').

this.fx.start(options1);

this.fx.start(options2);


return this;

}

});


window.addEvent('domready' function(){

// the Following call sequence move describe eight.

new CaterpillarController('Caterpillar').move(true true).

chain(function() { this.move(false true); }).

chain(function() { this.move(true false); }).

chain(function() { this.move(false true); }).

chain(function() { this.move(true true); }).

chain(function() { this.move(false false); }).

chain(function() { this.move(true false); }).

chain(function() { this.move(false false); });

});
Live example here. And here for example, does the chain not related — just a flight of fancy, but cool.
Animate private variables.
Until now, we used animations of different CSS properties. But, as I pointed out in the beginning of the article, class Fx can be used to animate anything. So it would be nice to try to write his heir Fx. As a basis we take an improved version of the script of the rheostat, which I wrote in this topic. What it is possible to animate? For example, the angle of rotation of the indicator. Remember that if you make a single click on the rheostat, the indicator immediately turns to the clicked point. But if one were to animate this transition? It would be funny and write something should be only a few lines :). So, what you need to create a full-fledged heir of Fx:the
-
the
- add the class Extends: Fx to inherit from. the
- to pass options to the base constructor. the
- override the method set to apply the values of the animated parameter to the "physics" setting, in this case, rotate the indicator to the angle value. the
- call start to start animation.
 set: function(now){

// now the current value of the angle during the animation.

this.oldMouseAngle = this.mouseAngle = this.angle = now;

this.updateIndicatorPosition();

}
The method that you react to mouse click instead of the instantaneous change in angle now calls the start method and passes it the current value of the rotation angle indicator and the angle at which it needs to be turned off after the end of the animation:
 captureMouse: function(e){

this.captured = true;


var mouseAngle = this.getMouseAngle(e);

if ((mouseAngle > = this.options.minAngle) && (mouseAngle <= this.options.maxAngle))


this.start(this.angle, mouseAngle);

}
That's all, we have an animated transition, to contemplate which here.
Standard animation plugins.
Fx.Tween.
This class is a simple class that animates any CSS property of the element. To work it needs a reference to the element being animated, the name of the animated CSS property and value range. Example of creating: var myFx = new Fx.Tween(element, [, options]);
This class is based example of using different equations of transitions:
 // Here we will change the CSS top property of an element with an ID of 'Ball'.

var fx = new Fx.Tween('Ball', { property: 'top', duration: 900, link: 'cancel' });

var transitionSelect = $('Transition');

var modifierSelect = $('Modifier');

var test = $('Test');


// When any of the following events to start the animation.

modifierSelect.addEvent('change', startAnimation);

transitionSelect.addEvent('change', startAnimation);

test.addEvent('click', startAnimation);


function startAnimation(){

// Get the name of the transition as a 'sine:in'.

fx.options.transition = transitionSelect.value + modifierSelect.value;


// Move the ball with the chosen transition.

fx.start(60, 400);

}
In the HTML code of the example, two drop-down list to animate the ball and the button just in case.
Fx.Morph.
is Used more often than Fx.Tween because you can simultaneously animate multiple CSS properties of the element. The constructor is almost the same as Fx.Tween except for the lack of the option property, instead the start method is passed an object describing which CSS properties to animate and in what ranges. For example: morph.start({
'margin-left': [0, 10],
'background-color': ['#EEE' '#555']
});
means that to animate two CSS properties: margin-left (0 to 10) and background-color ('#EEE' to '#555'). Value ranges can not be specified, and only indicate the final value, then the initial current will be taken from the value specified in the style element. As an example, include the use of Fx.Morph to create animated menu:
 var menuHeadItems = $$('#Menu .MenuHeadItem');


menuHeadItems.each(function(item, i){

var morph = new Fx.Morph(item, { duration: 900, transition: Fx.Transitions.Elastic.easeOut, link: 'cancel' });


// For each menu item will start an animation with progressive ms delay 100i.

// Animates two parameters: the opacity and margin-left. Therefore, the item "leaves"

// left simultaneously with the change transparency to 1.

morph.start.delay(i * 100, morph, {

'opacity': [0, 1],

'margin-left': 0

});


item.addEvents({

// When the cursor mouse move the item and make it darker.

'mouseenter': function(){

morph.start({

'margin-left': 8,

'background-color': '#DDD'

});

},

// uvedenie of the mouse, return the item in its original condition.

'mouseleave': function(){

morph.start({


'background-color': '#EEE'

});

}

});

});
And menus you can view.
the Official example.
Fx.Slide.
Pretty useful class when you need that something somewhere went or drove. The constructor is very similar to all previous, so much to dwell on it will not. I can only say that he understands quite a few options, the most important of which is the mode that defines the direction "vyezzhaniya": vertical or horizontal. On the basis of this class made two more examples with animated menu: first and second.the Official example.
Fx.Elements.
conveniently Allows you to animate any number of CSS properties for any number of elements simultaneously. Its constructor is passed an array of elements that will be converted. And the beauty inherent in the start method, there is passed an array of objects to convert. This means that every element of the array passed to the constructor corresponds to the element object from the array passed to start. Thus, there is a mass animation elements.The following example changes the opacity of the array element when you hover over them, and the closer the element to the fact that currently under the cursor, the less transparency, and more:
 var elements = $$('#ElementsContainer .Element');

var elementsFx = new Fx.Elements(elements, { duration: 500, link: 'cancel' });


elements.each(function(element, i){

// When the cursor is on the element recalculate the transparency of the neighbors.

element.addEvent('mouseenter' function(){

var arg = {};


// For all neighboring elements computed value transparency

// based on their distance from the current one.

elements.each(function(element, j){

arg[j] = { opacity: 1 - Math.min(Math.abs(i - j), 5) / 8 };

});


// Start change the transparency.

elementsFx.start(arg);

});

});
Live example.
an Interesting variant of the menu from MooTools.
I hope that readers were interested to dig deeper into the implementation of animation in MooTools. Most of the described here should be applicable to other frameworks.
Thank you for your attention.


Комментарии
Отправить комментарий